Applications to record the iPhone screen
If you are looking app to record iPhone screen without going through the computer, I'm about to mention some solutions that can do for you, available for free on alternative stores such as Cydia (which is only accessible after jailbreaking iOS).
AntRec
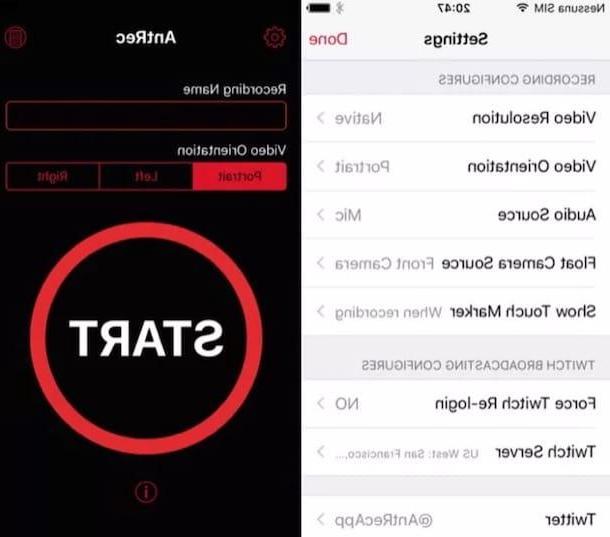
AntRec is an application, or rather, a tweak, which requires the jailbreak and therefore the alternative store Cydia to work. To install it, therefore, it is necessary that your device has been jailbroken and has an iOS version lower than 10. At the time of writing, in fact, the tweak only supports iOS versions up to 9.x, so if you have iOS 10 or later you cannot use it.
AntRec is free and allows you to record the iPhone screen with video and audio in high quality, also offering the possibility of shooting with the front camera of the phone and showing the shot in a small box. To install AntRec, open Cydia, go to the section of Research at the bottom right and type AntRec in the search field. Then select the name of the tweak from the search results and, in the screen that opens, first press the button Install and then on the button Confirmation.
When installation is complete, start AntRec by tapping on the app icon that appears on the home screen and, before starting a recording, choose the shooting orientation between Portrait, Left o Right. You can manage the settings and set your recording preferences by tapping on the icon gear present at the top left; you have several options available including video resolution and activation of shooting from the front camera Float camera source (to be set to front room). At this point you are ready to film: give a name to the video you are about to record, tap the button Home and on the voice Recording And that's it.
To end the video recording, press the AntRec icon again and tap the button Press to stop. You can view the recording by pressing the icon in the shape of sheet at the top right, while tapping on the preview of the video just recorded you can decide whether to see it (by pressing on the item Play), share it in other apps (opting for the Share) or whether to save it in the photo roll (by pressing on the item Save to Camera Roll).
AirShou

AirShou is an application with an intuitive interface and partly in your language. It is available for free in the Cydia store and, therefore, you need to have a jailbroken iPhone to use it.
Once you have downloaded and installed the AirShou app, you can start it by tapping on its icon. The first time you open the app, you are advised to export every recording you make as, if Apple revokes the application's certificate, you risk losing every movie. Then tap the button Agree to continue and you will be ready to start your registration.
You have two options at your disposal: Broadcast which, if you have an account on Shou.tv, allows you to do a live stream, or Register to make a local recording. The second item is the one that suits you, so proceed by tapping on the item in question. Before starting the recording, you can give a name to the movie you are going to make but above all you can choose the orientation and the resolution. So tap on the item Orientation and choose the option you prefer from HD Portrait, Overview (home button on the right), Overview (home button on the left) o Portrait (upside down). If you intend to decrease or increase the quality of the video, tap on the item Resolution and choose from 480p, 640p, 720p or 1080p.
After the setting phase, tap the button Next step, april il Control Center and, in AirPlay, choose the AirShou item with the device name next to it, for example AirShou (iPhone's). Registration starts automatically as soon as AirPlay is connected.
To stop recording, simply tap on the red bar at the top and press the button Stop. With the AirShou app, the videos made will not automatically go to the iOS Camera Roll but will be saved within the application itself. To retrieve them, tap the icon with the symbol Play present at the top right of the main AirShou screen. By tapping on the video of interest, you can choose whether to view it by pressing the voice Play; whether to open it with another app, by choosing the option Open in ..; whether to save it in the camera roll, by tapping on Save to Camera Roll or whether to delete it, by opting for the item Clear.
Web Recorder

The last app I want to tell you about is called Web Recorder and is available for free on the App Store. Are you wondering why after talking about jailbreak, Cydia and various permissions I propose a solution that can be easily downloaded from the Apple store? Because it is an app that does not record the iPhone screen in its entirety but only what happens inside it, and more precisely only the Web pages that are viewed with its integrated browser. If, therefore, your need is to be able to record your iPhone screen while browsing the Web, Web Recorder is the right solution for you.
To download Web Recorder on your iPhone, open the App Store and, in the search field, type Web Recorder. The full name of the app is Web Recorder - Record H5 games as video: once located, press the button Get e Install to start the download. Then, once the installation process is complete, tap on the app icon to open it and start your registration.
WebRecorder looks like a browser that allows you to record your browsing. At the bottom there is a menu with three buttons: to start recording, tap the central button in the shape of hoops, the same one you have to press to stop it. To save the movie, instead, tap on the item Save or, if not, about the option Cancel. To retrieve the video, press the button in the shape of video camera (the one on the right in the menu where all the saved videos are listed, which you can see, delete or share in other apps by tapping on them).
At this point, you are realizing that this solution is not the best, both because it is not possible to record audio, and because of the not high video quality. But if that's what you were looking for and you didn't want to run into more complicated procedures, I'm glad I helped you.
Record iPhone screen on iOS 11

In iOS 11 Apple has finally introduced the ability to record the iPhone (and iPad) screen without having to install any apps. How does it work? I'll explain it to you right away. The first step you need to take is to activate the recording function. Then click on the icon of settings (the gear on the home screen) and then go up Control Center. Then identify the option Screen recording, pigia sul pulsating + you see in green to add it to the control center and that's it.
Now, to record the screen, call up the control center and selects the icon of Screen recording, the one with the symbol Rec enclosed in a circle. Choose whether or not to activate the microphone and press on the voice Start recording to start filming. A blue horizontal bar appears at the top, which keeps you updated on the minutes and which you can press to stop recording. The movie is automatically saved in the Camera roll of iOS and you can play it like any video taken with the smartphone camera.
Record the iPhone screen via computer

If the solutions I have presented to you do not satisfy you or you do not have a compatible iPhone, you can rely on computer programs that allow you to record the screen of your "iPhone by" connecting it to your PC / Mac.
- QuickTime Player (Mac): this is the quickest solution if you have an Apple device. The default video player of macOS, allows you to record the iPhone screen by connecting it to the Mac via a Lightning cable and calling up the function New movie recording from the program menu.
- Reflector (Windows / Mac): it is a software that allows you to project and record the iPhone screen on a computer via AirPlay. It is available for Windows and macOS at a cost of approximately 13 euros (14.99 dollars). You can try it for free for 7 days but watermark the videos it generates.
To know in detail how to use QuickTime and Reflector to record the iPhone screen via computer, read my tutorial on how to record the iPhone screen: there you will find everything explained.
App to record iPhone screen
