How to create a free animated video
On the Net there are several tools, often usable for free, which allow you to create animated videos of various types with ease: below I will show you some of the best.
Animatron (online)
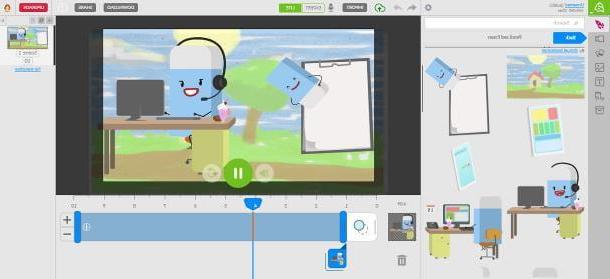
animatronic is an excellent online service that allows you to make “cartoon” style movies using both ready-to-use animations and importing your own creations. It might also be ideal if you are looking for a solution for create an animated video for children.
Basically, Animatron can be used for free, albeit with some limitations: you can save a maximum of five projects and export movies, to which a watermark is affixed, only in low quality. To eliminate these restrictions it is necessary to subscribe to a paid plan, with prices starting from $ 30 / month (more info here).
In any case, to try the service for free, connected to the Animatron home page, click on the button Try free below the item Create HTML5 and video animation and click on the button Sign up, to start creating a new account.
Pray click on your button Sign up with email, enter your address e-mail, your name it's a Password to use to log in, put the check mark next to the box I'm not a robot, to pass the CAPTCHA check, and click on the button Create my free account- Following this, you should be sent an email containing a confirmation link. To complete the registration, access your mailbox and open the link contained therein.
Alternatively, you can speed things up by logging in via Google, Facebook o Twitter: to do so, use the buttons on the registration home page and connect to one of the accounts in question.
In any case, once logged in, click on the button Start creating and use the areas in the left sidebar to start working immediately.
- Animated sets (symbol of missile) - contains a series of ready-to-use animations, of which you can also use the individual elements.
- Videos (symbol of video camera) - contains a set of movies to be included in the project.
- Pictures - contains a set of images to be included in the project.
- background (symbol of landscape) - contains a set of backgrounds to apply to the video scenes.
- Text (the symbol "T") - contains tools to insert and customize texts.
- Audios (the symbol of music note) - contains a series of music files to include in the project. However, this feature is reserved for Pro users only.
- Project Library (the symbol of box) - contains tools to import images, videos, files and sounds from your computer.
Once you have identified the element of your interest, drag it onto the work area to make the movie; to add new scenes, click the button instead capacitor positive (+) lead placed at the top right; if you want to duplicate the previous scene, use the button [+].

If you deem it appropriate, you can "dub" the video by recording your voice: to do so, click on the microphone placed high, granted the site to access the microphone (by answering affirmatively to the warning message that appears) and wait for the recording tools to appear (rec e stop). When you are satisfied with the result, press the button Add, to insert the dubbing into the timeline of the animated video.
Please note that Animator allows you to use two modes of work: the mode Lite, which contains the tools I've told you about so far, and the mode Expert, which includes other advanced options for editing movies. You can quickly switch between modes using the buttons located at the top.
Once your work is done, click on the button Download posto in alto, selects the voice Video… from the contextual menu proposed and, after indicating the resolution to download, click on the buttons Continue e Continue with restrictions to finish saving.
VyonD (online)

Another platform to easily create animated videos is VyonD: it allows you to create cartoons starting from standard models and numerous characters, with the possibility of uploading your own personal animations and dubbing the dialogues. It is mainly designed to create “business” themed animations but, with a pinch of imagination, it can also be adapted to other categories of use. VyonD can be tried for free for 14 days (with some restrictions), after which it is necessary to subscribe to the service, with starting prices equal to 89 $ / month (more info here).
To take advantage of the trial period of VyonD, connected to its official website, click on the button Try it free and choose whether to log in with Google or with Office 365by clicking on the appropriate buttons; alternatively you can sign up using your own email address.
In the latter case, press the button Sign up with your email address and fill in the proposed fields with the requested information: name, last name, company e role, telephone number, e-mail e Password. Finally, put the check mark next to the boxes I agree to the Terms of Service and have read the Privacy Policy e No thanks, I don't want to receive information and offers and click on the button Sign up for a free trial. To finish the registration, open the e-mail message you should have received from Vyond and click on the button Activate your account, to activate the trial and access the service.
Once logged in, click on the button Make a video placed at the top, locate the style of the animated video among those proposed and click on the button Select Style corresponding to your preference. After a few moments, you should enter VyonD's video editor, which contains everything you need to create an animated video.

To add an item, drag it to the work area or the timeline; the available contents are collected in practical sections, reachable through the buttons contained in the upper toolbar.
- Upload (the symbol of up arrow) - allows you to upload animations, photos, videos and audio directly from your computer.
- Character (the symbol oflittle man) - contains a number of characters to add to the animation.
- props (the symbol of armchair) - contains a series of scene objects which can be added to the animation.
- Chart (the symbol of pie chart) - contains a series of animated graphics.
- Text (the symbol of "T") - contains tools for adding text.
- Audio (the symbol of musical notes) - contains a collection of audio clips to add to the animation.
Each object can be customized, modified and animated as desired, using the buttons that appear in the appropriate bar located at the top right. To add a new scene, click on the button [+] placed on the timeline.
To preview the video, click on the button Preview, placed at the top. Once the work is finished, you can share the video in the form of a link by clicking on the symbol of sharing (the three dots joined) and selecting the item Enable link from the displayed panel. To download the video, click on the button instead Download (The down arrow): you should know, however, that this feature is reserved only for holders of a paid subscription.
Other methods to create a free animated video

If you believe that the solutions I have proposed so far are not suitable for your needs, I recommend that you consider using one of the alternatives that I propose below.
- Synfig studio (Windows / macOS / Linux) - this is an open source software that allows you to create 2D animations from scratch and, with a pinch of inventiveness, to create real animated videos. It's free.
- Pivot animator (Windows) - another great software that allows you to create animated videos, but based on stick figures and men. It's free.
- Scratch (Windows / macOS / Web) - is a tool designed to start the little ones in programming, making animations using a simple block programming language. It's free and I've told you about it in depth in this guide.
- Powtoon (online) - this is an online service that allows you to create various types of animated presentations, to be uploaded later on dedicated video platforms. In its free version, the length of the movies is limited to 5 minutes.
- Wideo (online) - another online service that allows you to create animated clips starting from the characters and objects available in the integrated library. It can be used free of charge for 7 days, after which a paid subscription is required.
How to create an animated video with photos
Do you want to create a animated video with photos personal, to show to your loved ones to describe a particular moment in your life? In this case, you can rely on some software already included in Windows and macOS.
Photo (Windows 10)

The first of these is the application Gallery di Windows 10: it allows you to create animated movies and slideshows, including audio, with extreme ease. The only essential requirement is that the images and audio files to be used are already present on the computer.
Having made this due clarification, it is time to get to work. For a start, call back Gallery from the menu Home of Windows 10 (the icon in the shape of pennant located in the lower left corner of the screen), click on the button New video collocato in alto a destra, selects the voice New video project from the on-screen menu and indicates a name to assign to the project, typing it in the appropriate box.
Now, to select the items to add to the video (photos and clips), click on the button Add placed on the board Project catalog; to add an item to the current movie, drag it to the Storyboard placed at the bottom; to apply customizations on the elements (titles, texts, filters, 3D effects and so on), after adding them to the timeline, click on the respective previews and use the buttons located in the right toolbar.
To add background music to the movie, click on the button Background music placed at the top; to insert, instead, personalized songs or voice recordings, click on the button Custom audio. When you are satisfied with your work, then press the button Finish the video (located at the top right), select the quality to be used in the rendering phase and click on the button Export to save the movie to your computer.
Photo (macOS)

A Mac, you can achieve a similar result using the application Gallery, installed “by default” in the operating system. It allows you to create a video containing the images imported into the Mac gallery, complete with audio, effects and transitions.
First, therefore, start the application by clicking on the icon colorful flower located in Dock, move the mouse cursor over the item My projects, located in the left sidebar, and click on the button capacitor positive (+) lead which appears in its correspondence. Now, choose the items Presentazione e Gallery from the proposed menu, assign a name to the presentation and click on the button OK to start creating it.
At this point, select the images you intend to use in the movie and click on the button Add to include them in the project; using the toolbar on the right, select the theme to be applied to the presentation (the symbol of overlapping rectangles), the music background (the symbol of musical notes) and the duration and transition for each image (the symbol of theclock).
When you are satisfied with your work, click on the button Export located at the top right, indicates the name of the movie, the folder rescue and the format of the same and click on the button Save to export it to the disc in the chosen quality.
Other methods to create an animated video with photos

If you feel that the programs I have told you about so far are a little too limited for your needs, know that there are many other software and services online that allow you to create animated videos with photos, even very elaborate ones. Here are a few.
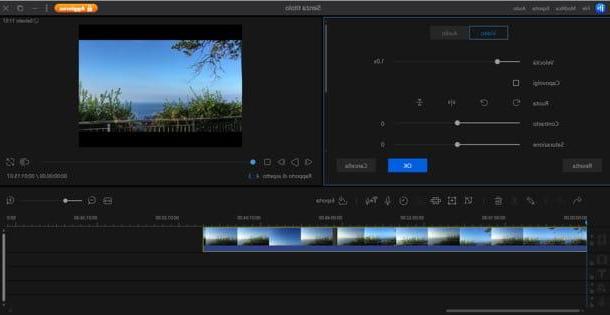
- EaseUS Video Edtor (Windows) - it is a video editing software that allows, among other things, to edit imported images on the fly, to apply various types of effects and transitions and much more. The program, in its free version, applies a watermark to the movies and does not allow export in Full HD; these limitations can be eliminated by purchasing the Pro version, which costs € 28,17 (annual license).
- SmartSHOW 3D (Windows) - another excellent program used to create animated videos with photos, and possibly music, whose interface follows that of the unforgettable Movie Maker. It's free.
- iMovie (macOS) - is the Apple video editing program, installed “as standard on macOS, which allows you to create videos containing photos, clips, audio and effects of various kinds, in a couple of clicks. I told you about it in depth in this guide.
App to create an animated video

How do you say? You don't own a computer and, for that reason, you are looking for app to create animated videos from smartphones and tablets? Do not worry, on the Android Play Store, on the alternative stores of the "green robot" and on the iOS and iPadOS App Store there are several applications that are right for you. Here are some of them.
- ScratchJr (Android / iOS / iPadOS) - is the mobile version, dedicated to children, of the aforementioned Scratch. It allows you to create effect animations using a block programming language. It's free.
- FlipaClip (Android / iOS / iPadOS) - is an application that allows you to create animated videos in "flip-book" mode, drawing each frame individually.
- Animation Desk (iOS / iPadOS) - is a semi-professional app dedicated to the creation of videos and cartoons which, in its tablet version, also supports the use of Apple Pencil. It's free.
- Magisto (Android / iOS / iPadOS) - is an application that allows you to quickly create animated videos containing customized photos, clips and audio. It's free.
- InShot (Android / iOS / iPadOS) - another excellent application dedicated to the rapid creation of movies containing your photos, together with effects and music, even following preset templates. It's free.
- iMovie (iOS / iPadOS) - this is the mobile version of the Mac program of the same name that I told you about previously. It's free.

