How to record PC screen without programs
If you have the need to record PC screen without programs, know that you can use for this purpose both an ad hoc function present in theWindows 10 Xbox application, that the tool User action logging (the latter allows you to record through screenshots, the activities that are performed on the screen). Let's find out in more detail how to best use both solutions.
Xbox (Windows 10)
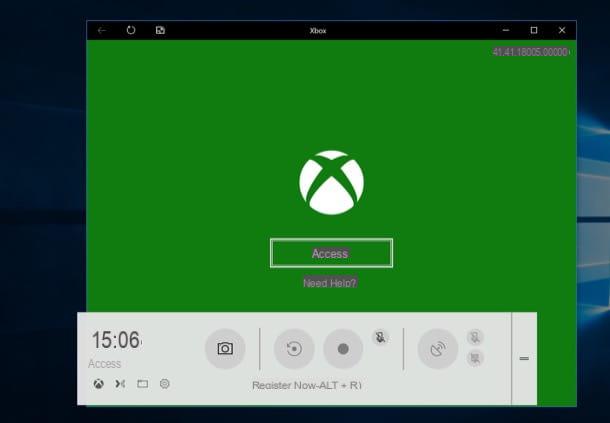
If you use a PC equipped with Windows 10, you can record the screen by using the screen recording function in the application Xbox, which you find pre-installed in the operating system and which, as you can well imagine, was designed to record gameplay videos (even if no one forbids you to "recycle" it for other purposes).
Before explaining how to use it, however, make sure your computer is equipped with necessary hardware requirements, in this case it must have one of the following graphics cards (if you do not know how to check which graphics card is installed on the PC, read the guide in which I explain how to do this).
- AMD Radeon HD 7700 series.
- AMD Radeon HD 7700M series.
- AMD Radeon HD 8500 series.
- AMD Radeon HD 8500M series.
- AMD Radeon R7 / R9 series or later.
- NVIDIA GeForce 600 or later.
- NVIDIA GeForce 800M or later.
After making sure you have the requirements to use the screen recording function of the Xbox application, start the Xbox application to start screen recording: open the menu Home, type the word "xbox”In the search bar and click on the first occurrence found to launch the Xbox app.
Now, press the keys at the same time Win + G on the keyboard and, when asked if it is a game, press on It is a game. In the toolbar that appears at the bottom, press the button Register now (l'icona del gray rod) to start recording and press the button Stop recording as soon as you want to stop it.
User Action Logging (Windows 7/8 / 8.x / 10)

If your PC is not updated to Windows 10 or if you do not have the necessary hardware to use the Xbox screen recording function, know that you can use the utility User action recording which is present on Windows 7 and on all subsequent versions of the Microsoft operating system. Before explaining how to use it, however, I would like to tell you that this Windows feature allows you to record the actions performed on the screen in the form of commented screenshots and not as movies. Having made this necessary clarification, let's find out together how to use it at its best.
To begin with, you need to start User Action Record - then open the menu Home, type "user action recording" in search bar and click on the first available occurrence. Alternatively, press the key combination Win + R, then type psr in the box that opens and press the button OK.
At this point, presses on the button Start registration to start the recording and, to end it, press the button Stop recording. In the window that opens you will be shown the preview of the photographic recording that has been made: if you are satisfied, press the button Save, indicates the name and location to save the file ZIP created and click again on Save.
To view the record of the actions performed on the screen, extract the contents present in the ZIP file by right clicking on the archive Extract all ... ed Extract, then open the document MHTML with any browser and that's it: as you can see, User action recording has captured screenshots showing the actions performed on the screen, complete with descriptive comments.
How to Record Mac Screen Without Programs
You use a Mac and are you interested in knowing if it is possible to record the screen without resorting to third-party programs? The answer is yes. On the computers produced by Apple, in fact, there are several applications equipped with the screen recording function: let's analyze them in detail.
QuickTime Player

Let's start, of course, with QuickTime Player, the “standard” integrated multimedia player on macOS. How to use? Now I'll explain it to you, it really is a breeze.
For starters, start QuickTime Player by clicking on its icon in the Launchpad (or, if you prefer, search for it with Spotlight o Crab) and select the item New screen recording from the menu Fillet (at the top, in the menu bar). In the window that opens, click on the symbol (⌵) and, from the drop-down menu that opens, choose whether to capture theaudio from the webcam and whether to view i mouse click during registration.
In case you want to get a box with the webcam footage in the recording you want to make, before starting the recording remember to click on the item New movie recording from the menu Fillet and activate the option Always in the foreground from the menu Vista.
As soon as you are ready, start the registration: then press the button REC (l'icona del red dot) and choose whether to record the entire computer screen, by clicking anywhere on the screen, or to capture only a portion of the desktop, making a selection with the cursor and then pressing the button Start recording.
When necessary, stop recording by pressing the button Stop (l'icona del small square inside the circle located at the top, in the menu bar) and displays the preview of the recording you made by pressing the button Play. If you are satisfied with the movie made, select the item Export as from the menu Fillet, select one of the available output resolutions (720p, 1080p, 4K, etc.), choose the location to save the video and, finally, press the button Save.
Screenshot

If you are using a version of macOS equal to or later than 10.14 (Mojave), you can count on the updated version of the utility Screenshot, which allows you to take screenshots and - what interests you most right now - video recordings of the Mac screen.
To record the Mac screen with Snapshot, press cmd + shift + 5 on your computer keyboard and, using the toolbar that appears on the screen, choose whether to record everything Mac screen or alone a portion of the same (they are the central buttons). Then he presses the button Register and make your screencast.
When registration is complete, click on the button stop present in the menu bar, top right, and the video will be saved on the desktop (or, in any case, in the default folder where the screenshots are saved). After the end of the registration, a will appear miniature of the video in the lower right corner of the desktop: by clicking on the thumbnail in question, you can cut the video, share it online or trash it, using the appropriate icons located at the top right of the window that opens.
Other solutions to record screen without programs
If the solutions I have proposed so far have not left you fully satisfied, you can resort to some browser extensions that allow record the screen without resorting to programs real.
Vidyard Go Video (Chrome)

One of the first extensions I recommend you try is Vidyard go video: a free add-on available for Chrome which is quite simple to use. Among its "pros" there is certainly the fact that it does not watermark movies (which most of the extensions of this genre do) and that it is quite simple to use.
To download Vidyard, start the Chrome browser, connected to the Chrome Web Store page that hosts the extension and first presses the button Add located at the top right and then up Add extension. In the tab that opens in the browser, register for the service through your account Google, Outlook or your e-mail pressing the corresponding buttons and, once logged in, presses the button Allow permissions and consent to the access of the webcam and microphone by the extension by clicking on Allow.
To start the screen recording, click on theVidyard icon located at the top right and, from the box that opens, presses the button Tab to register the current card, on the button Screen to record the whole screen or on the button Cam only to use the webcam only.
Then decide whether to activate the webcam by pressing the button Cam and, to finally start the screen recording, click on the button Record (if you have decided to record the screen, confirm that you want to start the recording by pressing the button Share). Once the registration is complete, click again on the add-on icon located at the top right and, on the page that opens, you will be able to view the video, share it on social networks or send it as an attached file.
Loom (Chrome)

Loom is another extension for Chrome which I invite you to try to record the PC screen (including the webcam). Although it is quite simple to use, it has some limitations to take into account: it sets a limit of 10 minutes on the duration of the recordings, imprints a watermark on the videos and does not allow you to access your videos for more than 24 hours (this limit can be overcome by saving them in the room ). However, it is possible to remove the aforementioned limitations by inviting other users to subscribe to the service through the referral link on your profile.
To install Loom on Chrome, connected to the Chrome Web Store page that hosts the extension, click on the button Add and then Add extension. Then click on theLoom icon located at the top right, register with your account Google, Outlook or with your address e-mail pressing the corresponding buttons and, once logged in, grant the extension the necessary permission to access the microphone and the webcam, by first pressing the button One-click access which appeared after logging into the account and then on the button Allow.
To record the screen, open a new Chrome tab, click again on theextension icon (always located at the top right), presses the button Record present in the box that opens and click on the button Current tab, to record what happens on the current tab, or on the button Full Desktop, to record what's happening across the screen. To finally start the recording, then, presses the pink button Start Recording and then press the button (✓) to stop it and access the page through which to save or share the video made.
How to record PC screen without programs

