PhotoFace (Online)
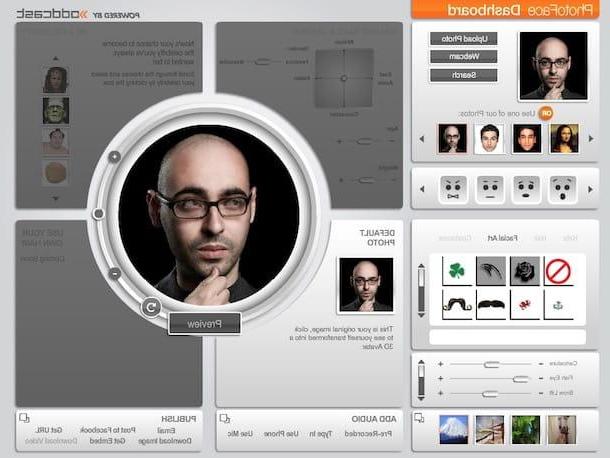
The first of the useful resources for creating a 3D face that I want you to try is PhotoFace. It is an online service through which it is possible to generate a three-dimensional, animated and, if desired, even speaking face, starting from a simple selfie. It's free and offers very noteworthy end results.
The only thing you must necessarily keep in mind is that in order to use it you need to Flash Player installed on the PC (for more details on this, read my dedicated article) or you can use a browser that integrates it "as standard" (eg. Chrome).
To use PhotoFace, the first step you need to take is to connect to its website. Once this is done, choose, by clicking on the buttons at the top left, whether to upload the photo you intend to use directly from your computer (Upload photo), whether to take one at the moment using the webcam possibly connected to the PC (Webcam) or whether to take the shot from the Internet (Search). You can also use some ready-to-use images, just select the one you prefer from the various proposals below.
Then specify if the face in the photo is that of a man or that of a woman and click on Next twice in a row. Then click on the box Default photo so that you can see the three-dimensional preview of the 3D face. If this interests you, I would like to point out that you can also mask the newly generated three-dimensional face as a celebrity by clicking on the box Be a celebrity at the top right and choosing from the character you like most.
Therefore, proceed to customize the facial expression using the commands on the left. Proceed in the same way with the aesthetic characteristics, just use the controls that are a little lower. Then add, if you want, a background by choosing from those available in the appropriate list on the left, at the bottom of the screen.
As for the possibility of making the newly generated three-dimensional face speak, you have to click on the links corresponding to the section Add audio. More precisely, by clicking on Pre-recorder you can load an audio file already saved on your computer by pressing on Type In you can type a text to be spoken while clicking on Use Mic you can make a voice recording right now using your computer's microphone.
Finally, choose whether to save the newly created 3D face as an image or as a video by pressing, respectively, on the links Download image or download video which are located in the lower right part and click on OK. If, on the other hand, you prefer to share the three-dimensional character generated via email, Facebook, direct link or embed code, select the relevant link from those available and that's it.
Thats My Face (Online)

Did the above service to create a 3D face not convince you in a particular way and are you looking for some alternative? Then try taking a look at Thats My Face. It is free and allows you to create a three-dimensional character starting from your own photo using a very accurate facial analysis system. If desired, it is also possible to request (but for a fee) the creation of an action figure or other gadget with your face, always in 3D.
To use it for your purpose, connect to the home page of the service and click on the button Upload Photos which is on the left, scroll down the new page displayed and press the button Continue. Then create an account on the site by selecting the link Create an account which is below and filling out the form that appears with the requested data. Then he presses the button Sign Up.
At this point, you will find yourself again in front of the main page of the Thats My Face website. Click on the button again Upload Photos, Then Continue and fill in the fields displayed to log in with your previously created account.
Then fill out the new form on the screen by typing your name, your age, your gender, your ethnicity and choose whether to keep the beard or not (if present in the photo). Then click on the button Choose file / Open file at the section Fronal Photo and select a front photo of you and save it to your computer.
For an even more accurate final result, you can choose to also upload photos of your left and right profile by clicking on the button Choose file / Open file that you find in the sections sections Left Profile Photo (optional) e Right Profile Photo (optional). Then press the button Upload which is at the bottom and then on that Continue.
To conclude, move the colored squares that appeared on your photo on the left to the points indicated in the example photo on the right, click on the button Submit at the bottom of the screen and then press on Ok. You will then be sent an email from the service with the image of your 3D face that you can download to your computer and use as you see fit.
3D Face Reconstruction from a Single Image (Online)

3D Face Reconstruction from a Single Image it is instead an online tool developed by researchers at the University of Nottingham and Kingston University in the United Kingdom powered by artificial intelligence that allows in a few seconds to transform a frontal photo of a face into a 3D model and to rotate it and observe it from different perspectives . It's free, works from any web browser and the final result can be saved to your computer as an .obj file.
To use it, connected to the web page of the service, check the box next to the item I'm not a robotclick on your button Choose file / Open file, select the front photo saved on your computer that you want to turn into a 3D face and press the button upload Image.
Therefore, wait for the upload procedure to be started and completed and on the page that will subsequently be loaded you will therefore find yourself in the presence of your three-dimensional model.
Then use the adjustment bar on the empty to define if and how much you want to separate the 3D face from the photo below and leave or remove the check from the box next to the wording Show background image to define if you want to leave or remove the background. To download the face instead, press the green button at the top, always on the right.
Looxis Faceworks (Windows)

Instead of relying on an online service, would you prefer to create a 3D face using a special computer program? Then I strongly advise you to contact Looxis Faceworks. It is a no-cost program for Windows operating systems which, similarly to the solutions I have already told you about, allows you to transform a very common photo into a three-dimensional face through simple commands within everyone's reach. It allows you to define facial contours and adjust the points on the face. It should be noted that together with the front image it is necessary to select two others to create the three-dimensional right and left sides of the model.
To use it, first connect to the download page of the program on the Softpedia website and click on the button Download at the top left then select the button Sotpedia Mirror (US) and wait for the program to be downloaded to your PC.
When the download is complete, open the .exe file you just obtained, click on OK and subsequently on Next. Then select the item I accept the agreement to accept the terms of use of the service and press again on Next then click on the button install, its Yes and to conclude press on Finish.
Then start the program by recalling it from Start menu then click on the item Model in the upper part of the window of the same, press on Load Front ... and select a front photo of you saved on your computer that you want to use as the basis for the creation of the three-dimensional face.
Now, adjust the overlapping points and lines on the photo you just selected in the left part of the window so that they perfectly coincide with the contours of the face. In the meantime, at the bottom right of the program window you can see a preview of what has been done.
Click now on the button with the lattice that you always find in the upper part of the program window, on the toolbar, and place all the additional points that have been added on the photo in correspondence with the nose, eyes, mouth, cheekbones, etc. then proceed with the upload of the right and left side photo by first clicking on Load Side ... and then Left Side on the menu Model and proceed in a similar way to what I have just indicated.
Once the changes are complete, click on the item Fillet at the top left and choose Save As to save the three-dimensional face generated in the format compatible with the program only or choose Export ... to save them in .obj format.
Myidol (iOS)

Do you want to create a 3D face straight from your smartphone or tablet? Then the best resource in the category is without a doubt Myidol. This is a free app usable only on iOS thanks to which it is possible to create beautiful three-dimensional avatars with decidedly realistic features including not only the face but also the rest of the body. Everything is done by taking a photo at the moment (or by loading one from the camera roll) and making any subsequent customizations to the generated character. The final results are very realistic and satisfying.
To use it, download, install and start the app on your iDevice and then press the button Tap to created your avatar in the main screen of the same, position in front of the front camera of the iPhone or iPad and try to align the nose, eyes, forehead and mouth with the guides that you see appear on the screen and then presses on the display to take a selfie. Alternatively, take a photo already saved from the gallery by tapping on the preview at the bottom right.
So wait for the app to process your face and then move the points added on the photo in such a way as to trace the contours of the face, indicate if the person in the image is male or female and when the procedure is completed you will find yourself in the presence of yours. three-dimensional avatar that you can further customize using the various controls at the bottom of the screen. For example, you can change the color of the skin, the haircut, the accessories used, the clothes, the shoes, etc.
Then when you have obtained a final result that satisfies you, stop on the item Done at the top right, assign a name to your avatar and press on green tick then use the various options that you see appear on the display to change the background, add stickers and various other decorative elements and to save them in the roll of the device or, again, to share the 3D character on social networks.
Other interested solutions

In addition to using the resources I have already told you about, if you want to deepen the topic orienting towards more, let's say, professional solutions, I inform you that you can create a 3D face (and not only that) by turning to programs and resources conceived specifically for three-dimensional drawing.
If this interests you, I therefore recommend that you immediately take a look at my article dedicated to programs for drawing in 3D. You can also find other interesting solutions in my tutorial on how to create 3D drawings and in my post dedicated to 3D animation programs.
How to create 3D face
